BecomeSingers is reader-supported. When you buy through links on our site, we may earn an affiliate commission. Learn More
If you want to start playing the guitar, you’ve probably seen chord diagrams online that make very little sense. In this article, I’ll teach you how to read guitar chords and get you playing quickly.
I have been playing the guitar since I was five years old, when I began conservatory studies. It took a long time until I honed my fingerpicking skills, but it paid off later when it allowed me to release several albums and teach others. If you’re worried, don’t be! Everyone can learn how to read guitar chords and become a guitar player.
Table of Contents
How to Understand Guitar Chord Diagrams
Guitar chord diagrams are graphical representations of a guitar fretboard. The lines represent frets and strings, and the dots and wide lines represent your fingers. Additional information, such as numbers, represents the fret position on the fretboard.
There’s no uniformity when looking for chord diagrams online. They can be displayed vertically or horizontally. While horizontal chord diagrams are easier to understand, most websites display chord diagrams vertically.

You’ll find six vertical lines which represent guitar strings. From left to right, the vertical lines correspond to guitar strings from the 6th to the 1st, from low to high (E, A, D, G, B, E in standard tuning).
The horizontal lines are the fret divisions. These are the rectangles which your guitar neck is divided into. Sometimes there’s a thicker line, which usually corresponds to the beginning of the fretboard.
Then, you have the dots, usually shown in black and white. Black dots almost always occur only inside the diagram, representing your fingers. In more detailed diagrams, you might find tiny numbers over each dot. These represent your fingers.
However, most diagrams use numbers below each string to indicate which finger to use. Numbers go from 1 to 4 and from the index finger to the pinky, so number 1 is the index, number 2 is the middle finger, number 3 is the ring finger, and number 4 is the pinky.
White dots are outside of the diagram, meaning you need to play those as ‘open’ strings i.e., play them with your plectrum but don’t place any fingers on them. If you find an X symbol instead, it means you shouldn’t play that string.
Sometimes you’ll find a thick, horizontal line on the diagram. This represents using your index finger as a ‘bar’ to play chords. This is usually written as ‘bar’ or ‘barre’.
You might find chords requiring other fingers instead of the index in more complicated scenarios. Everything is indicated by the numbers below the diagram.
Finally, the letters and words on top are the chord names. You’ll find phrases and words such as “C minor”, “A”, “Bb”, “F#Maj7,” and so on.
What Are the 5 Basic Guitar Chord Diagrams?
When learning how to read guitar chords, it’s vital to understand it like a sign language of sorts. This is because you’ll eventually take a quick glance and understand what type of chord it is and how to put your fingers on the fretboard effortlessly.
For that, we will look at five different chords and how to understand them.
1. The E minor chord
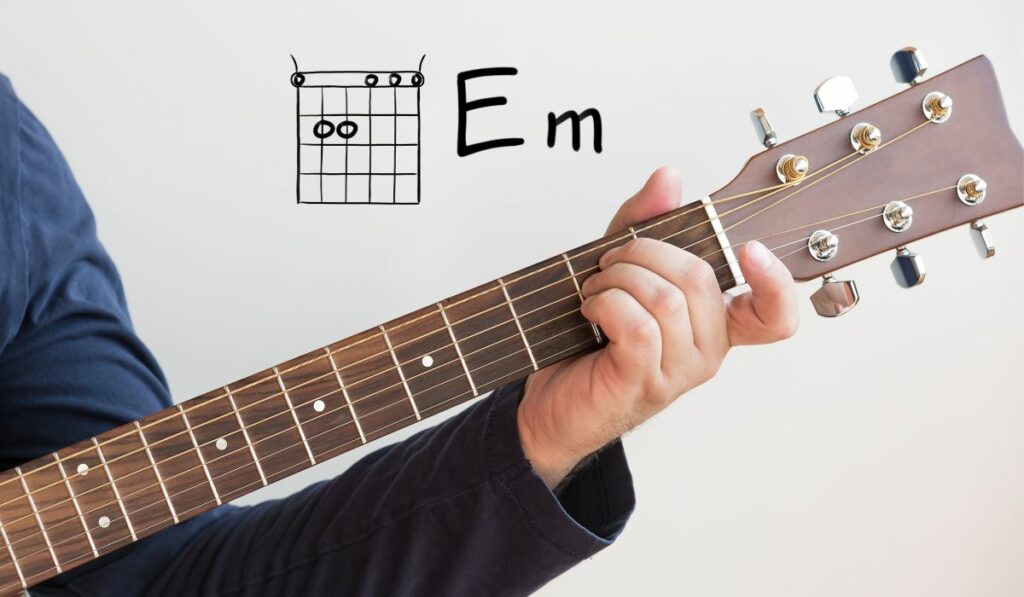
There are few chords as easy as E minor, thanks to several things. First, you only need to use two fingers, and you can play all strings without any dissonance. Let’s take a look at what a diagram for E minor looks like.
You’ll see two black dots on the 2nd fret, representing the two fingers you must use. Some people like using fingers 1 and 2 (remember, these are the index and middle fingers), while others, including me, prefer 2 and 3, that is, middle and ring fingers. Choose what feels most comfortable for you, and press both strings simultaneously.
Then, you’ll see white dots on top of the diagram. This means you need to play all the strings. That’s it!
2. The A chord

This case is very similar to E minor, but there’s a twist. First, let’s go to the basics. You need to use three fingers this time, represented by numbers 1, 2, and 3, that is, the index, middle, and ring fingers. All of them go on the 2nd fret.
You can also check that there are two white dots, one on the 5th and the other on the 1st. These dots represent strings you play with without any fingers on them.
However, there’s a novelty: an X on the 6th string. This means you shouldn’t play this string.
3. The F minor chord

Here, we have one of the simplest barre chords. There is a big bar on the 1st fret, which represents your index finger. You have to place it in a way that covers the entire fret, applying equal pressure to the strings. This can be quite difficult.
The other fingers are displayed with their corresponding black dots and numbers, normally 3 (ring finger) and 4 (pinky) for this chord, on the 3rd fret. The good thing about this chord is that you play all the strings since there’s no X symbol, and you can move your hand in this shape along the fretboard to play other chords.
Check our article on best takamine 12 string acoustic guitars
4. The B chord

This is another barre chord that’ll allow you to understand a couple more things. As usual, a thick line represents your index finger, and dots represent the other. The index goes in the first string of the 2nd fret, while fingers 2, 3, and 4 go in the 4th fret over the 4th, 3rd, and 2nd strings, in that order.
However, two things might happen in this case. You may either see a barre chord line covering all six strings and an X or a barre chord line covering the first five strings and an X.
In any case, the expected outcome is the same: you shouldn’t play the 6th string. Some people like placing their index partially to cover the first five strings, while others prefer placing it over the entire string range and not playing the 6th one. However, check the last method for an important thing to notice.
Once you master this, you can move your hand to another position, much like the F minor example. So if you want to play a C, you move one fret to the right. Wait, isn’t the C chord a non-barre one? Let’s check the next method to understand that.
5. Barre chords with fret annotations
As you’ve learned from the chords mentioned above, there are many ways to play different chords. This is because notes are repeated across the fretboard. In our examples, we used barre chords with the root note, or keynote, on the 6th and 5th strings.
This means that you can put the fingers the same way as a B, for instance, and play a G#, F, or any major chord. Sometimes for more convenient playing, it’s indicated that you use a barre chord instead of a regular one.
When that happens, the diagram will indicate the fret number where you should put your hand. For instance, you might see a D chord that looks exactly like a B, but it starts on the 5th fret, which is usually indicated on the right side of the diagram.
FAQs
Here are some common questions about chord diagrams and learning guitar.
What should a beginner guitarist learn first?
What does a line on a chord diagram mean?
How do you identify a chord pattern?
Conclusion
As you can see, chord diagrams are easy to read once you understand what’s going on. Ironically, it’s much easier to read barre chords, which are harder to play, than easier chords to play like Dm.
Remember that pros use certain chord forms because of more advanced issues, such as fitting better in a pattern or offering a more suitable timbre for a specific part. You, however, might be better off using easier chord forms.
For instance, if the song displays a barre E minor on the 7th fret, you can play the simplest form you learned. It won’t sound the same but it’ll still be the same chord.
Reading chord diagrams is a basic skill for any aspiring guitarist, but don’t push yourself. Many songs have complicated chords which might be too much to handle for you at the moment. Keep them in mind, and as you progress, you’ll see how easy they become.


